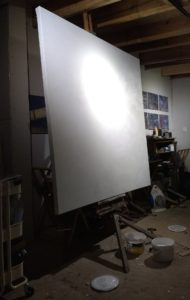
I recently made a mammoth stretched canvas (5ft x 5ft) and thought sharing my process might be of use to fellow Artists.
In this detailed tutorial I’ll carefully talk you through my approach to the craft of canvas making, the way I was taught to do it as well as my own adaptions.
I hope you enjoy the following write up and I’d love to hear from you if you decide to give this a go or have any suggestions which could improve on my own approach.

Materials and equipment needed
-
Canvas. Click here to view useful information about the main types, cotton duck and linen.
-
Stretcher Bars/Support Bars. Various thicknesses depending on overall canvas size. Click here to view an example
-
Staple Gun- Lightweight is usually suitable
-
Canvas Pliers. Click here to view an example
-
Priming materials (Gesso or traditional rabbit skin glue and oil primer). Click here to view an example
-
Sharp knife or scissors
-
Tape measure or string
-
Brush (size depending on canvas size, apply common sense!)
Example of my blade, canvas pliers and lightweight staple gun.
Step one- Construct the frame
Sounds and looks easy but this is one of the most crucial stages of canvas making. At this stage you must make sure that the frame is square.
There’s probably lots of ways to confirm the the frame is square, the method I use involves a piece of string for smaller canvases or a tape measure for much larger canvases.
Once you have pushed together the corner joins of the frame and along with support bars (Larger canvases), lay it flat on the ground or against a wall. Then using string or a tape measure, measure the diagonal from the most outer corner to the opposite corner as shown in the image below.
Write down or remember the measurement and then do exactly the same on the opposite diagonal from corner to corner. This measurement should be as close to identical as possible. If it’s not then simply push on the stretcher bars to adjust and remeasure (This can be fiddly and something you must figure out during the process)
I landed on my feet first time taking an identical measurement on the first go! Now that is rare, it usually takes me 2-3 adjustments before I’m ready to move on to step 2.
TIP***–String or tape measure? I use string for smaller canvases because I can span the distance with my arms (Make sure to keep the string tight to give accurate reading).
I use a tape measure for much larger canvases when I’m unable to make the span of the frame with my arms. The tape measure has a little 90 degree end which is useful for locking over the corner of the canvas, making sure it doesn’t move. Be very careful that the tape measure doesn’t slip off and retract, it can cause a lot of pain when it hits your knuckles and even cause a cut!
TIP 2***–DO NOT STAPLE THE CORNER JOINTS OF THE FRAME! This is a big mistake that many Artists and canvas manufactures (usually cheaper brands) make. The point of stretcher bars is that small wooden wedges can be installed in the corners of the reverse of the canvas if the material goes slack during the creative process.
The wedges are hammered alternately until the joins in the stretcher bars open and ‘stretch’ the canvas to a desired tension.

Step 2– Making your own support bars (optional)
You could argue that this belongs in step one, constructing the frame. Now, usually the larger stretcher bars are manufactured with holes on the inside of the frame, usually mid point. These holes receive the end of the support bar which is simply slotted in before closing the corner joints of the stretcher bars.
The support bar does exactly as the name suggests, it will give the frame added strength which is crucial to the later stages of stapling and priming the canvas material.
Smaller stretcher bars don’t usually need additional support from a support bar and for this reason, they don’t usually come with the support slots.
So here’s why I’ve given support bars their very own ‘Step’ in this tutorial…..My 5ft stretcher bars didn’t come with the holes! Strange I know and I wish I’d checked before ordering. It’s not such a big deal as they’re super easy to make and attach. However, the downside is that it will add time to the canvas making process.
Here’s what to do if you order larger stretcher bars that didn’t come with the necessary holes for support bars….
To make your own support bars you’ll need some suitable planed timber which you can pick up at any builders merchants or B&Q type stores. The timber I had lying around the studio was left over from a DIY project and is actually bordering on being too lightweight for this particular canvas. I decided to go ahead and get the job done but i know for certain I’ll be adding more robust support bars at a later date.
The first thing I did was to make a mark mid point on all four lengths of stretcher bar. The number of support bars required will depend on the dimensions and format of your canvas frame. As my canvas will be 5ft square I opted for a standard two bar cross. However, if you have a long slim format, a 40inch by 15inch frame for example, it would be wise to only span the shorter distance to stop the longer bars bending inwards later.
I then cut the timbers to fit snugly inside the canvas frame and positioned them one on top of the other in the position they would go.
To make the two piece fit flush together, I marked the width of the wood as they laid on one another at the crossover. Using a mallet and chisel I removed 50% of the timber thickness on both support bars. If you get this right the two timbers should fit nicely together.
Attaching the support bars is simple…
Recently I started to use mirror plates as pictured above. I use the side with two holes to screw down into the main canvas frame. I use the single slotted side to fix to the support bar.
But why this way around? inserting only one screw into the support bar can greatly reduce the chance of splitting the timber.
TIP**– As the canvas may need to be stretched at a later date using the small wedges on the reverse, it makes sense to enable the support bars to allow for movement. If not, the corners of the stretcher bars would open and expand but the support bars would pull on the centre of the stretcher bars causing an inwards dip.
Using a slotted mirror plate allows for this expansion eliminating the possibility of warping. Just make sure not to screw down too hard!
TIP 2**– Because you will most likely need to use smaller screws to stop the point piercing through to the canvas, the screw heads might be slightly smaller than the mirror plate slot opening.
If this is the case you can easily solve this problem by first pushing the screw through a small washer which will give the screw head more area.
Step 3– Canvas Cutting
Canvas materials can vary massively, from traditional heavy weight linen to a flexible calico. It’s well worth experimenting with a variety of materials and learn about them through painting on them, you’ll quickly decide on which material suits your painting style/process.
You’ll also learn how to adjust canvas types to suit different projects/canvas size and other factors.
Canvas can be bought in many stores including online stores, Ebay is a perfect place to pick up reasonably priced materials which can be shipped directly to you. If purchasing online you can usually order sample pieces of materials to feel the weights/thickness and weave(fine/course) before making an actual order.

To cut your canvas material, I think it’s good practice to lay down the stretcher bars on top so that you can clearly see the size you require. It’s so easy to make a measuring error resulting in a piece of material 10 cm too short, take it from me!
You can see from the image above that I cut the canvas leaving plenty of material to wrap around the edge and also the back of the stretcher bars. This measurement will vary depending on the stretcher bar dimensions.
When cutting canvas I prefer to use a sharp Stanley knife as I can gain a nice continuous line, this is also possible with good quality fabric scissors (try both and decide for yourself).
TIP– If you decide to cut with a blade like I do, be careful when removing the surplus material. Occasionally the material could still be joined by a thread or two.
Do not pull the material to snap the thread as this can cause the material to crease. Instead carefully cut the thread with the blade.
Step 4–Stapling the canvas
This is the part of the whole process that I love the most.
Don’t have canvas pliers?? Buy some….seriously, having the right kit to get the job done makes the whole process so much more pleasurable and quicker!
You can see from the image above that canvas pliers have a wide end, almost hammer head shark shape. Normal pliers are straight and narrow.
Although it is possible to stretch the material with normal pliers, you will have a much harder time and also massively increase the risk of tearing more lightweight canvas materials.
Canvas pliers help to give a more even and wider pull on the material. Not only this, they usually have a small lug on the underside which helps you to gain leverage against the canvas frame.
Start by laying the canvas frame flat on the canvas material, making sure that the material to wrap around the frame is even the whole way around.
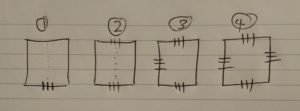
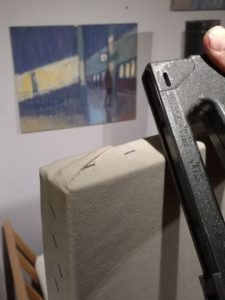
Then, wrap the material around and staple one edge bang in the middle on the reverse of the stretcher bar. I personally pump 3 staples 2 centimetres apart, I then walk around to the opposite side of the canvas and wrap around the material but this time without stapling.
I hold the material on the frame and lift it up so that the canvas is standing vertically. Then, using the canvas pliers I grip and pull the material to give tension (Figure 2 above), at this point I pump 3 staples to match the opposite side of the canvas.
The technique I use is this, to work from the middle to the end on each piece of stretcher bar. This way you can really minimise the chances of the material gathering and causing ripples across the finished surface.
Here’s a little sketch showing the above description which might make things more clear.

TIP***– It’s easy to think that the unprimed material should be as tight as drum, but this is far from the truth and will cause serious problems when priming. If you do stretch the canvas too much at this stage, once primed the canvas will contract and could cause serious warping of the stretcher bars.
Instead, aim to take up some of the slack, not worrying too much about small creases etc. When you prime the material it will contract as it dries creating greater surface tension, the creases and wrinkles will disappear by themselves (you’ll notice as you prime later).
Finishing corners can be tricky and there’s no easy way to do this. This stage is really down to practice and getting the ‘knack’ of it. I’ve included an image below to show the kind of thing we should be aiming for, something that is tight to the stretcher and looks neat and presentable, especially if the piece is to be exhibited unframed.

Step 5–Seizing and/or priming
Priming can be divided into two main camps, the traditional and the non traditional. I’ll be focusing on the non traditional, acrylic gesso priming in this tutorial but plan to create a tutorial dedicated to oil priming at a later date.
Here’s a quick over view of oil priming…
The traditional method entails boiling up a batch of rabbit skin glue which is laid evenly onto the bare canvas with a soft brush and allowing to dry. This acts as a barrier against the traditional oil based primer which is later applied in a minimum of two layers. Depending on your preference for surface type, you can also lightly sand between layers of primer, giving a very smooth surface.
Some of the advantages of oil primer include a very durable and resistant surface as well as a naturally less absorbent finish in comparison to gesso priming. This method of priming is extremely satisfying and I’m sure something that seasoned Art collectors would greatly appreciate.
If you’re the kind of painter that likes to constantly rework images, scrape paint back and work with palette knives, this is definitely a method of priming that you should consider.

The non-traditional, Acrylic Gesso. The brand I use and have always used is Winsor and Newton Galeria which can be bought in various sizes. This method of priming is less time demanding but yields some similar results to oil priming.
I suggest applying this material in 2 layers as a minimum, making sure to fill every pore of the canvas. This acts as a barrier to oil pigments, something which would otherwise eventually rot the natural material of your canvas(as I was taught!).
When I prime with either acrylic or oil primer, I apply generously using a circular motion with the soft brush. Once you have covered the whole surface including the edges of your canvas, you could finish with brush strokes running in a single direction.
The same option to sand between layers also applies here, achieving a smoother finish.
The second coat is applied in the same manner using circular motions. If the first coat was finished using a single direction, this can be done again but applying in the opposite direction, creating a weave with the bristle marks.
Funnily enough, I enjoy working with slightly textured canvases and with this in mind I rarely sand between layers of priming.
TIP**– If you prefer a smooth finish and visible canvas weave, be very careful not to saturate the material surface with primer. But remember that it is key to cover every single part of the front and sides of the canvas to create a barrier for your painting pigments and mediums.

Taking care of your kit and more tips
Making your own canvases is very satisfying and can be a good way to save money without compromising on quality. In my opinion there’s no real negatives to creating canvases other than the time it might take you.
If you already or are considering to give this a try it’s well worth investing in good equipment. At the end of each canvas making session, it goes without saying that you should take care of your equipment.
-
Blade/scissors- always make sure that your blade/scissors are sharp, if not, replace. Cutting corners can cost you more in the long run, especially when cutting canvas!
-
Staple Gun- always keep a supply of extra staples that fit. Before purchasing your staple gun, make sure that extra staples are easy to get a hold of.
-
Brushes- always wash up with warm soapy water to maintain a soft bristle (Acrylic Gesso). Wash in white spirits or brush cleaner followed by warm soapy water (Oil based primer).
-
Canvas- left over canvas could be useful for creating smaller canvases or canvas panels, either fold neatly or roll and store in a clean and dry environment.
I suggest finding a suitable tray or rigid box to house everything, keeping the complete kit together. This will save you the headache of trying to locate various bits and pieces as well as saving you valuable time.
The key to great canvas making is to be organised, practice lots and take pride. Good luck!
If you’ve enjoyed this tutorial and would be interested in more helpful tips for Artists then make sure to subscribe to my blog to be notified of future posts. Scroll to the bottom of any webpage to enter your email address.
You can also subscribe to my newsletter for previews of latest works, news and exclusive subscriber offers.
Don’t miss this…
How to make your own wet panel carrier


